파이썬 openCV 24번째 강의는 노이즈 제거 : 알파-절삭 평균값 필터링(alpha-trimmed mean filtering)입니다. 이번 강의가 마지막 salt-and-pepper 노이즈 제거 강의입니다.
0. 알파-절삭 평균값 필터링(alpha-trimmed mean filtering)?
알파 절삭 평균값 필터링의 이름을 풀어서 해석하면 다음과 같이 풀이할 수 있습니다.
| 가중치(알파)를 두어 일부를 자르고(절삭) 그 값들의 평균값을 취한다. |
즉, 일정 마스크 내에서 일정한 부분을 자르는데, 그 자르는 부분은 가중치를 두어 임의로 조절 할 수 있게 합니다. 그렇게 자른 값들의 평균을 취한다는 뜻입니다.
| 5 | 3 | 2 |
| 9 | 1 | 8 |
| 7 | 6 | 4 |
3 x 3의 마스크에서 위와 같은 값들이 있다고 가정하겠습니다. 우선 위 값들을 오름차순으로 정렬해 줍니다.
| 1 | 2 | 3 |
| 4 | 5 | 6 |
| 7 | 8 | 9 |
이제 아래와 같은 공식으로 알파-절삭 평균값 필터링을 진행합니다.
| OUT = mean(mask[ int(alpha * 9) : - int(alpha * 9) ] ) ( 0 <= alpha <= 0.5 ) |
이때 알파 값을 0.5로 주게 되면 0.5 * 9 = 4.5, 이를 int 변환하면 소수부분은 버려지게 되어 4가 됩니다. 즉 앞뒤로 4칸씩 빼면 가운데 값인 5만 남게 되어 평균은 의미가 없게 됩니다. 따라서 출력값은 5가 됩니다. 이 경우는 사실상 중앙값 필터와 같은 효과를 가집니다.
만일 알파값을 0으로 주게 되면 0 * 9 = 0으로 자르는 부분이 없게 됩니다. 그렇다면 마스크 전체의 평균값이 되게 되어 평균값 필터와 같은 효과를 가지게 됩니다.
이처럼 알파-절삭 평균값 필터링은 중앙값 필터와 평균값 필터의 장점만 가지고 만들어진 필터입니다. 따라서 노이즈의 종류나 원하는 필터링에 따라서 알파값을 바꾸면서 필터링할 수 있습니다.
1. openCV에서의 알파-절삭 평균값 필터링(alpha-trimmed mean filtering)
img = cv2.imread('lenna.png')
height, width, channel = img.shape
우선 영상을 불러와 줍니다.
noise = img.copy()
salt = int(height * width * 0.1)
for i in range(salt):
    row = int(np.random.randint(99999, size=1) % height)
    col = int(np.random.randint(99999, size=1) % width)
    ch = int(np.random.randint(99999, size=1) % channel)
    noise[row][col][ch] = 255 if np.random.randint(99999, size=1) % 2 == 1 else 0
그 후 salt-and-pepper 노이즈가 첨가된 영상을 만들어 줍니다.
out = np.zeros((height + 1, width + 1, channel), dtype=np.float)
out[1:1 + height, 1:1 + width] = img.copy().astype(np.float)
temp = out.copy()
for i in range(height):
    for j in range(width):
        for k in range(channel):
            mean = np.sort(np.ravel(temp[i:i + 3, j:j + 3, k]))
            out[1 + i, 1 + j, k] = np.mean(mean[int(alpha * 9):-int(alpha * 9)])
out = out[1:1 + height, 1:1 + width].astype(np.uint8)
이제 제로 패딩 된 출력용 영상에 중첩 for문을 통해 알파-절삭 평균값 필터링을 하게 됩니다. 이때 alpha값은 함수를 불러올 때 미리 정해줄 수 있습니다.
이제 결과 영상입니다.


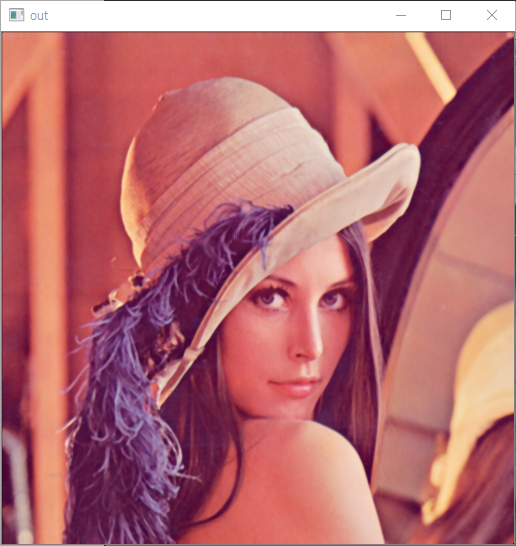
저는 알파 값을 0.3을 주고 출력해 봤습니다. 결과는 salt-and-pepper 노이즈를 잘 제거한 것을 볼 수 있습니다.
2. 마치며
이제 총 5개의 강의에 걸친 노이즈 제거가 끝이 났습니다. 이다음부터는 주파수를 통한 영상 변환을 강의하겠습니다.
def alpha_trimmed(alpha=0.3):
    img = cv2.imread('lenna.png')
    height, width, channel = img.shape

    noise = img.copy()
    salt = int(height * width * 0.1)
    for i in range(salt):
        row = int(np.random.randint(99999, size=1) % height)
        col = int(np.random.randint(99999, size=1) % width)
        ch = int(np.random.randint(99999, size=1) % channel)
        noise[row][col][ch] = 255 if np.random.randint(99999, size=1) % 2 == 1 else 0

    out = np.zeros((height + 1, width + 1, channel), dtype=np.float)
    out[1:1 + height, 1:1 + width] = img.copy().astype(np.float)
    temp = out.copy()
    for i in range(height):
        for j in range(width):
            for k in range(channel):
                mean = np.sort(np.ravel(temp[i:i + 3, j:j + 3, k]))
                out[1 + i, 1 + j, k] = np.mean(mean[int(alpha * 9):-int(alpha * 9)])
    out = out[1:1 + height, 1:1 + width].astype(np.uint8)

    cv2.imshow('salt', noise)
    cv2.imshow('original', img)
    cv2.imshow('out', out)
cv2.waitKey(0)'파이썬 강의 > openCV' 카테고리의 다른 글
| 파이썬 openCV 26. 주파수 : 푸리에 변환을 이용한 저주파 필터(LPF) / 고주파 필터(HPF) (0) | 2020.12.22 |
|---|---|
| 파이썬 openCV 25. 주파수 : 푸리에 변환(Fourier transform) (1) | 2020.12.19 |
| 파이썬 openCV 23. 노이즈 제거 : 최댓값(Maximum) / 최솟값(Minimum) 필터 (0) | 2020.12.15 |
| 파이썬 openCV 22. 노이즈 제거 : 메디안(median)과 하이브리드 메디안(hybrid median) (0) | 2020.12.14 |
| 파이썬 openCV 21. 노이즈 제거 : 나가오-마츠야마 필터(Nagao-Matsuyama filter) (0) | 2020.12.13 |